

The Ultimate Guide to DIY Solar Water Heater
This guide will focus on two DIY solar water heater ideas. First, it focuses on DIY solar water heater making process. Second, it take you DIY solar water heater installation process.
So, if you are looking to be an expert in these two areas, read this guide.
Part I: DIY Making Solar Water Heater
Building a DIY solar water heater can be a rewarding project that helps you save on associated acquisition and installation costs. In undertaking a DIY solar water heater project, using a simple batch-type is affordable, presenting less difficulty in construction.
Materials for Making a Solar Water Heater
The process of making and installing a DIY solar water heater requires the utilization of various materials. While their availability and costs may vary, carefully planning and sourcing required materials will ensure a smooth and successful project.
Consider the local weather conditions and desired energy requirements to personalize the solar water heater system. Additionally, and most importantly, undertake safety precautions when handling tools and working with the materials and heat transfer fluids.
Some of the materials your will need for you DIY project include:
Solar Collector Materials
The solar collector makes the heart of the water heating system, responsible for sunlight capture and conversion into heat. The primary materials you can utilize to build the solar collector includes:
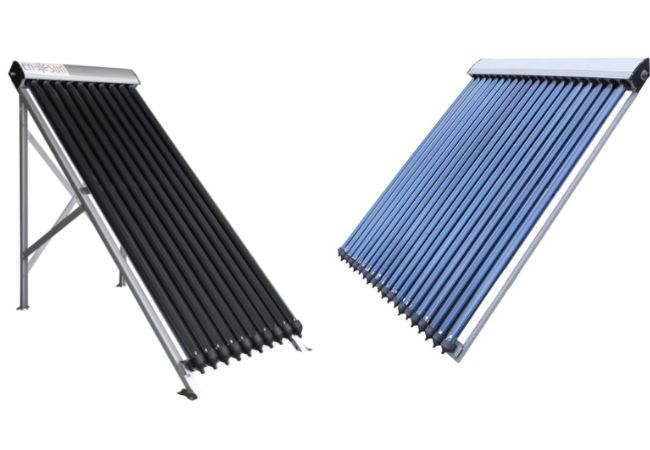
- Copper pipes and aluminum cans used for the absorber plate. You can also use PVC pipes darkened with a black paint or absorber coating to increase the rate of heat absorption. The choice of materials will basically depend on their availability and your budget.
- Insulation material enhances your collector’s efficiency by preventing heat loss. These can be fiberglass, foam board, or closed-cell spray foam applied to the back and sides of the solar collector.
- Glazing material offers protection to the collector, allowing sunlight to pass through and trapping the heat inside via a greenhouse effect. Common options include a single or double layer of glass, a clear plastic sheet, polycarbonate or acrylic.
- Reflective material while optional, can help you enhance the absorption of solar energy within the solar collector.
Frame Construction Materials
A sturdy solar water heater frame holds the solar collector assembly in position and typically includes a backing to offer the collector support and stability. Materials used for these include:
- You can use wood, galvanized steel or aluminum for constructing the frame.
- The backing should be solid and fashioned from material like plywood.
- Screws, bolts, nails, nuts, and/or brackets will be useful in assembling and securing the frame.
- Where needed, paint or sealant can be employed in weatherproofing the frame for protection from the elements.
Plumbing Components
Plumbing components allow you to connect the solar collector to your building’s plumbing infrastructure and existing water heating system. To improve efficiency by reducing heat loss, it is critical to insulate the solar collector pipes.
Some of these materials are highlighted below:
- Pipes usually copper or PEX find common use for their durability and for their heat-conductivity.
- You can utilize insulation sleeves or wraps for pipe insulation with adhesive.
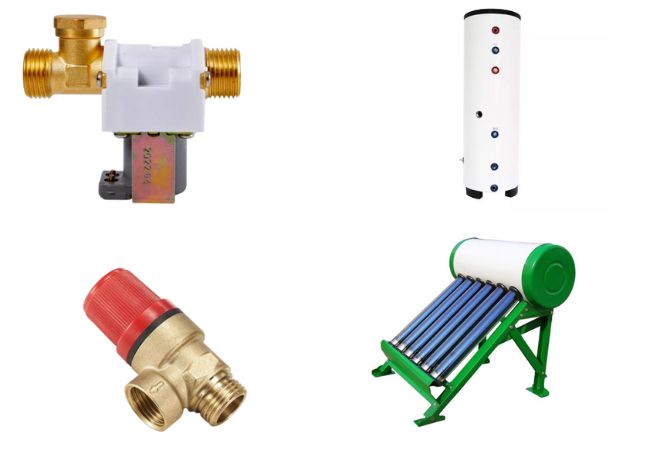
- Elbows, couplings, tees, and flow control valves for plumbing connections.
- Temperature and pressure relief valve help ensure system safety.
- Check valves are useful in preventing reverse flow of hot water when the pump is not running.
Heat Transfer Fluid and Accessories
The heat transfer fluid is essential in a solar collector as it carries the absorbed heat to the water storage tank. Water is essentially used in temperate climates while propylene glycol is common in colder climates where it helps prevent freezing.
Sometimes, depending on your system type, you can utilize a pump to circulate the heat transfer fluid through the system.
Water Tank Materials
Choose a suitable water storage tank to store the heated water ensuring it is insulated. The water tank should ideally have a capacity determined by your household’s water usage. The tank should also be capable of handling the increased temperature and be compatible with the heat transfer fluid.
In order to prevent heat loss, using insulation material around the sides, base, and top of the water tank is necessary. Materials with good insulating properties suitable for this include: fiberglass, foam board, or closed-cell spray foam.
You can also add a reflective material like aluminum foil to your tank set-up. This enhances the absorption of heat within the water tank or container.
Temperature Control Components
These are not necessary and can be left out without hampering the performance of your DIY solar water heater. For instance, where you desire precise temperature control, you can install a temperature sensor and thermostat.
Additionally, a temperature and pressure relief valve ensures your solar water heating system is safe. It functions by releasing excess pressure when temperatures or pressure inside the system become excessive.
Tools and Safety Accessories
Tools allow you to perform the fabrication and construction exercise for your DIY solar water heater. Safety accessories, on the other hand, keep you safe and ensure your system achieves the desired safety performance level.
These include:
- Standard DIY tools like drills, saws, screwdriver and measuring tape.
- When you opt for copper piping, you may need soldering iron or a heat gun.
- Safety gear like gloves, mask and eye protection are useful when handling insulation or potentially hazardous materials.
- Overpressure and relief valve help prevent excessive pressure build-up in the system.
- While optional, the overflow drain aids in preventing water spillage from expansion.
Step-by-Step Process for Making a Solar Water Heater
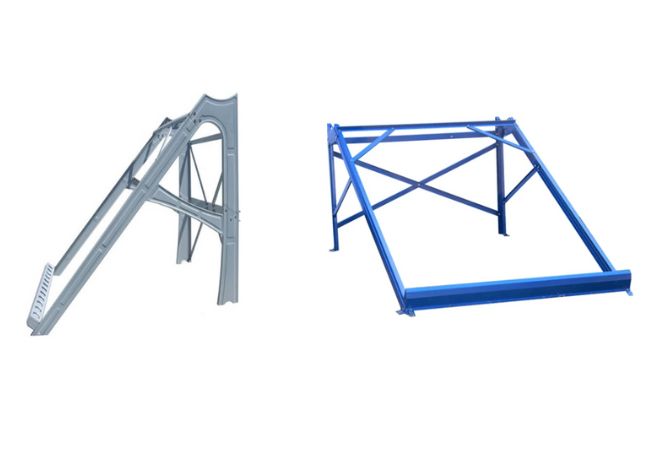
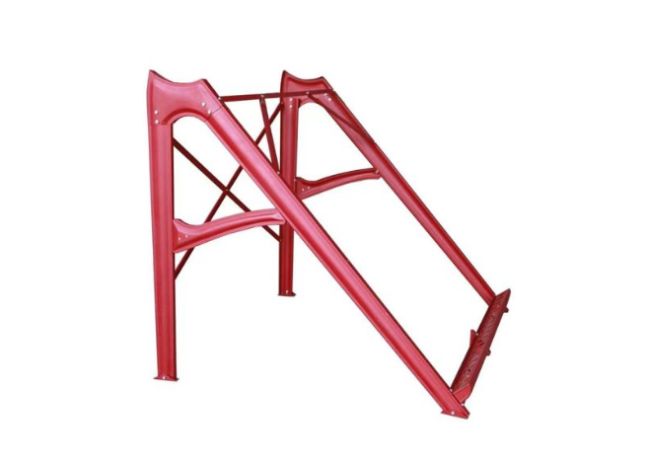
1. Frame Construction
Constructing a sturdy and reliable frame is a fundamental aspect of building a DIY solar water heater. The frame provides support to the solar collector assembly while ensuring system stability and durability.
Here’s a discussion on frame construction for your solar water heater project:
Materials Selection
The choice of materials for the frame will depend on factors such as budget, the size of your solar water heater and availability. Wood, aluminum, and galvanized steel are commonly utilized each with its own advantages:
- Wood: Wood is relatively inexpensive, widely available and easy to work with. You can use cedar or pressure-treated lumber as they are capable of withstanding outdoor conditions. However, regular maintenance may be required to prevent warping or decay.
- Aluminum: Aluminum frames offer you outstanding qualities like being lightweight, corrosion-resistant, and offering good structural strength. While they cost more than wood, they require less maintenance.
- Galvanized Steel: Steel frames are robust, durable, and weather-resistant capable of supporting larger and heavier solar water heaters. However, as DIY project, working with steel may be more challenging as it may require some welding.
Design and Dimensions
Plan your frame’s design and dimensions based on your solar collector’s intended size, glazing, and insulation. Also consider the weight of the components and the intended location of the water heater. The frame should be able to support the load and withstand wind and other environmental factors.
Assembly
The assembly methods for your frame will vary depending on the chosen materials. When using wood frames, screws, nails, or brackets can aid in joining the pieces. Remember to pre-drill holes to prevent splitting. While aluminum or steel frames can use bolts and nuts to securely assemble the pieces, they may require welding.
Weatherproofing
The solar water heater will be exposed to the elements making weatherproofing essential. When using wood for your frames, consider applying a weather-resistant sealant or paint for moisture and UV rays protection. When using metal frames anti-corrosion coatings or paint to prevent rust suffice.
Mounting
Make a decision on the best mounting option for your solar water heater, where it could be ground or roof-mounted. Whatever option you select, ensure your frame and structure is strong enough to handle the weight of the entire system.
Adjustable Angles
Having adjustable angles for your solar water heater ensures optimal performance. This way, you can tilt the collector towards the sun’s direction given the seasonal positional changes in the sky. Adding adjustable legs or brackets to the frame can help achieve this.
Safety Considerations
When constructing the frame, consider safety by smoothing out any sharp edges that can cause injury during installation or maintenance. The frame base should be stable to support the collector and glazing avoiding instability which can cause accidents.
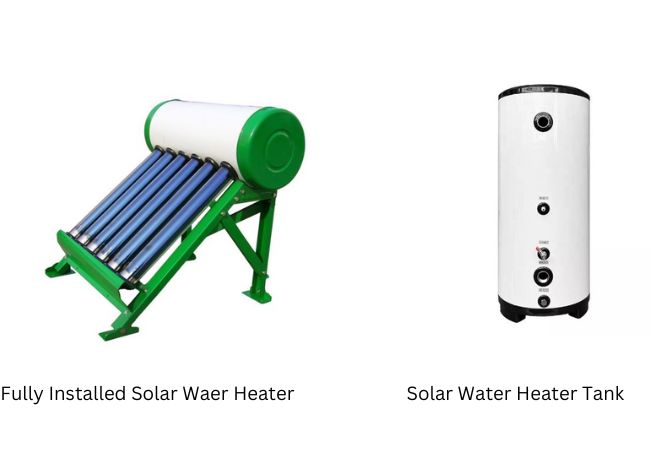
2. Container Preparation
The container, usually a water tank, holds the water to be heated by the solar collector. Its design and insulation play a significant role in the overall efficiency of the system.
Here’s a discussion on container preparation for your solar water heater project:
i. Choose a suitable water tank whose capacity can accommodate that of the solar water heater and your household’s hot water needs. You can purchase a conventional water tank or repurpose industrial plastic storage containers.
ii. Insulate the container all round utilizing materials like fiberglass and foam board ensuring there are no gaps or air leaks. Proper insulation maintains the container’s heat retention properties, minimizing heat loss and keeping water hot for an extended period.
iii. Consider adding a reflective surface inside the container to enhance heat absorption. Lining the interior with reflective aluminum foil is a simple way to do this. This helps bounce the solar energy back into the water, preventing it from being absorbed by the container’s walls.
iv. Install inlet and outlet ports at appropriate locations on the container to connect the solar collector and plumbing system. The inlet allows entry of cold water into the container while the outlet carries the heated water to the household plumbing.
v. For more precise temperature control, you can install a temperature sensor and thermostat inside the container. These components will help in the regulation of flow of water, ensuring it reaches the desired temperature.
vi. Include an overpressure and relief valve to prevent the container from building up excessive pressure. This is a safety feature that ensures the system remains within safe operating limits.
vii. It is possible for the water to heat excessively and/or expand owing to temperature changes. In this case, you can consider adding an overflow drain to prevent spillage of water and potential system damage.
viii. Where the container is not black or darkened, consider painting the exterior with a dark, heat-absorbing color. You can also apply a solar-absorbing coating which will increase heat absorption from sunlight maximizing energy transfer to the water.
ix. Ensure the container is securely mounted within the frame of the solar water heater capable of supporting the system load.
x. Also ensure all seams in the container are properly sealed and made water-tight to prevent water leakage and maintain efficiency.
3. Making the Absorber Plate
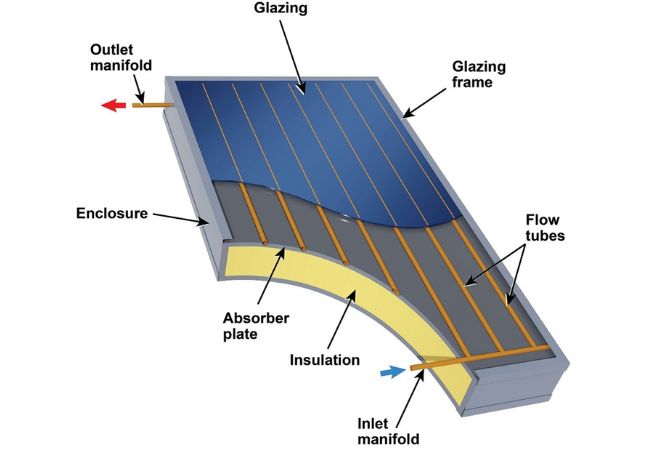
The absorber plate is responsible for capturing solar energy and is typically located inside the solar collector. In making the absorber plate for your solar water heater project, the following steps are essential:
- Selecting the Material: The absorber plate utilizes highly thermally conductive and corrosion resistant material like copper and aluminum. You can choose between copper pipes and aluminum sheets or cans depending on the design preference, budget and availability.
- Design: The absorber plate design and dimensions will depend on the solar collector size and desired water capacity. Ideally, the plate should cover as much surface area as possible within the collector to increase absorption of solar energy.
- Coating the Plate: Efficiency of the absorber plate is further improved by coating using a dark, heat-absorbing material. Black paint is a simple and effective option providing high solar absorption properties.
- Preparing the Material: When using copper tubing, aluminum sheets or cans, clean their surfaces removing any contaminants and/or coatings or films. Doing this ensures you achieve better adhesion of the absorbing paint.
- Applying the Absorbing Coating: It is pivotal you follow the manufacturer’s guide when applying the absorber coating. Apply multiple coats allowing sufficient drying time between coats ensuring an even coat for consistent heat absorption.
- Drying and Curing: Allow the absorber plate to dry and cure before assembling into the solar collector. Adhering to the recommended curing time emphasizes the coating’s durability and effectiveness.
- Protection and Sealing: Consider protecting the surface of the absorber plate from potential damage during installation. Cover it with a protective layer, like plastic film to prevent scratches and other surface infractions.
- Installation in the Collector: Carefully and securely place the absorber plate inside the solar collector. When using copper pipes properly connect them to the inlet and outlet ports. For aluminum sheets or cans, securely mount them providing good contact with the glazing.
4. Insulation
Insulation, when making a DIY solar water heater, helps retain the heat generated by the solar collector, maximizing efficiency. Proper insulation ensures the heated water stays hot for an extended period, even with low sunlight such as nighttime.
When handling insulation materials, wear appropriate safety gear like gloves, mask and eye protection. Contact with some insulation materials can irritate the skin or respiratory system.
Undertaking insulation for your solar water heater project entails:
Selecting Insulation Material
You have various options available for insulation materials, with the choice guided by the thermal performance, budget and availability. The following materials are commonly used in the insulation of solar water heaters:
- Fiberglass: Fiberglass insulation is readily available, cost-effective and easy to handle and install.
- Foam Board: Foam board insulation is relatively lightweight, moisture and thermal resistant, and can be easily cut to desired size.
- Closed-Cell Spray Foam: Forms an airtight seal, provides superior insulation thanks to its high thermal resistance and is ideal for irregularly shaped spaces.
Insulating Process
The insulating process can take a threefold form as follows:
i. Insulate the back and sides of the solar collector to prevent heat loss to the surrounding environment. Cut the insulation material ensuring there are no gaps for air to pass through. Use adhesive or fasteners to secure the insulation in place.
ii. Insulate the water tank to help retain the heat in the water by applying the chosen insulation material around the container. Pay attention to the thickness of the insulation to achieve optimal heat retention.
iii. Consider adding a reflective film to the interior of the insulation to enhance heat absorption within the container. Reflective materials like aluminum foil can help bounce the heat back into the water, increasing efficiency.
iv. Insulate the pipes connecting the solar collector to the tank to reduce heat loss during transfer of heated water. You can wrap the pipes with insulation material or use pipe insulation sleeves.
Sealing and Air-Tightness
Ensure all seams and joints within the insulation are properly sealed to maintain air-tightness. This prevents convectional heat loss due to air circulation between the insulation layers keeping the system working efficiently.
Efficiency Testing
Undertaking an efficiency test after installing insulation is essential to ensure it works effectively. It entails monitoring the temperature of the water over several days while checking for any noticeable heat loss.
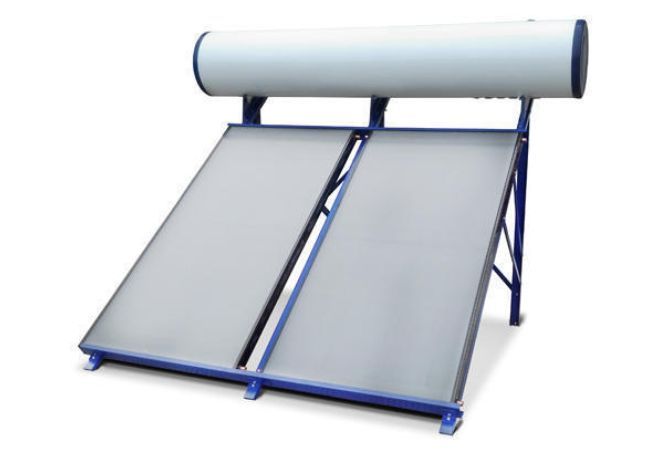
5. Glazing
The glazing process allows you to provide for the adequate capture of solar energy while reducing heat loss. It entails attaching a transparent/translucent enclosure over the absorber.
A guide to the glazing process when undertaking a DIY solar water heater project goes this way:
i. Determine the size and shape of your glazing by interpreting the system design for your solar water heater. Ideally, the glazing is inclined to maximize solar energy absorption and prevent debris accumulation.
ii. Choose your preferred glazing material ensuring it is durable, thermal stress, UV and weather-resistant, and has good solar transmittance properties. Common choices include tempered glass, plexiglas (acrylic), or polycarbonate sheets.
iii. Cut the glazing material to the desired size and shape using appropriate tools like glass cutter and saw. Where possible, you can cut out multiple panels to cover the entire solar water heater.
iv. Assemble a frame to secure the glazing material using weather-resistant material like wood, metal, or PVC. Apply a weatherproof sealant around the edges of the glazing material before placing onto the frame. The sealant prevents entry of water and air while maintaining a secure bond with the frame.
v. Mount the glazing to the solar collector’s main frame using hardware such as screws. Where you have a movable cover, attach hinges and handles to opposite sides of the frame for easy opening and closing.
Part II: DIY Installing Solar Water Heater
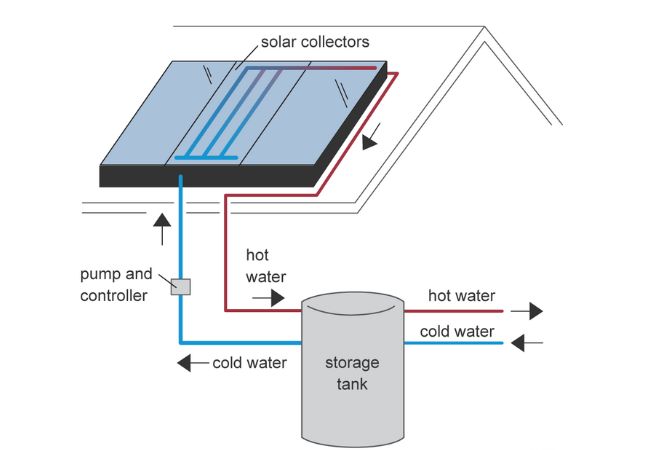
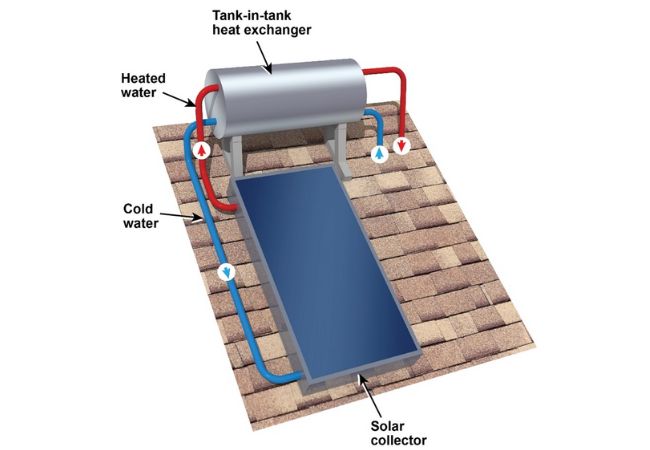
Installing a solar water heater involves several steps which may vary depending on the system type. This guide discusses the installation of a basic active solar water heater with a closed-loop system. This system utilizes a heat exchanger in transferring heat from the collector to the water in the tank.
Site Evaluation
This involves selecting a location with good exposure to direct sunlight throughout the day and oriented towards the sun. When evaluating the ideal site, ensure the collector is unobstructed by shadows from nearby trees or buildings.
Properly assessing the site before installation ensures optimal performance, efficiency, and longevity of the solar water heating system. Here are some key factors to consider during site evaluation:
- Sunlight Availability: Determine the solar potential of the site by determining how much sunlight it receives throughout the day and year. Install the collector where there is direct sunlight access for most of the day, with minimal shading.
- Orientation and Tilt Angle: The solar collector’s orientation and tilt angle are crucial for maximizing solar energy absorption. For areas in the northern hemisphere, the collector should ideally face true south and vice versa. The site’s latitude determines the tilt angle ensuring most sunlight capture throughout the year.
- Roof or Ground Mounting: Make the decisions to either mount the solar collector on the roof or on the ground. Roof mounting is a common choice for space-saving and aesthetics, but requires a structurally sound and well-oriented roof.
When going for roof mounting, the roof’s load capacity should safely support the weight of the solar collector system. Ground mounting offers more flexibility in terms of positioning but may require additional support structures.
- Local Climate and Weather: Consider temperature ranges, snowfall rates and frequencies, and hail risks. The system should be capable of withstanding extreme weather events and prevent damage to the collector or related components.
- Accessibility: Ensure the site you choose is easily accessible for installation and future maintenance tasks. It should be possible to carry materials, tools, and equipment to the site.
- Local Regulations and Permits: Check local regulations for any specific guidelines or restrictions to solar-related installations. Not adhering to such where applicable may result in costly fines and losses from reinstallation.
- Distance to Water Storage: Position the water storage tank as close as possible to the solar collector. This minimizes heat loss resulting from the transfer of heated water.
- Safety Considerations: Identify and address any potential safety hazards associated with the site. Safely install the solar water heater and its components avoiding situation that can pose risks to occupants or passersby.
- Aesthetics and Landscaping: Consider the impact of the solar water heater on the property’s aesthetics and landscaping especially for ground mounting. Choose a location that blends well with the surroundings and doesn’t obstruct scenic views.
Mounting the Solar Collector
Properly securing the solar collector upon mounting ensures stability, optimal sun exposure, and efficient heat absorption. When mounting the solar collector for water heating, ensure it is as close as possible to the storage tank.
The mounting process for the solar collector in a DIY project involves:
- Determining the Tilt Angle: Use the site’s latitude to calculate the tilt angle in order to maximize solar energy absorption. The optimal tilt angle is usually close to the site latitude. To cater for seasonal adjustment, add or subtract a few degrees for better performance.
- Selecting Mounting Type: Roof mounting is common for residential installations as it takes advantage of existing structures saving space. Ground mounting is suitable if you have enough space and want more flexibility in positioning the collector.
- Prepare the Mounting Structure: For roof mounting, ensure that the roof is structurally sound capable of supporting the applied weight. Install flashing and waterproofing materials around the mounting points to prevent leaks. When ground mounting, set up support posts for the frame using suitable anchoring materials to secure them firmly into the ground.
- Attaching Collector to Frame: Securely attach the solar collector to the frame using brackets, screws, or other appropriate fasteners. The collector should be level and properly aligned with the tilt angle.
- Sealing: Seal all joints and connections to prevent water infiltration and weather damage by using appropriate weatherproofing materials.
- Connect to Plumbing: Once you securely mount the solar collector, connect with the plumbing components and water tank.
Positioning the Storage Tank
The storage tank holds the heated water from the solar collector. Its location should be carefully chosen to optimize heat retention and ensure easy access.
Some of the guidelines for positioning the storage tank include:
- Proximity to Collector: Place the storage tank as close as possible to the solar collector to minimize heat loss during transfer of heated water. Shorter distances also reduce the amount plumbing material required and improve system efficiency.
- Gravity-Flow vs. Pumped System: You can employ a gravity-flow or pumped system to induce circulation of water within your system. The former has the storage tank positioned above the solar collector initiating natural flow. For the latter system, a circulation pump is used to move the water between the collector and tank.
- Indoor or Outdoor Placement: For indoor placement, you achieve better insulation and protection from extreme weather conditions. However, there’s need for additional space and ventilation. An outdoor location requires use of durable materials for protection from direct sunlight and freezing temperatures.
- Accessibility: Choose a location that allows easy access to the storage tank for maintenance and repairs. There should be sufficient space around the tank comfortably execute work during inspections or troubleshooting.
- Safety Considerations: Position the storage tank such that it is safe and secure to avoid accidents. If the tank is indoors, take precautions to prevent water damage in case of leakage.
Connecting the Solar Collector to the Storage Tank

In connecting the solar collector to the storage tank use proper plumbing connections for efficient transfer of heated water. The storage tank, ensures you have hot water stored for later use when you have low sunlight.
Setting up the connection requires the following:
- Gather the necessary plumbing components, including pipes, elbows, tees, couplings, flow control valves and insulation. These materials should be suitable for handling hot water and compatible with the both the solar collector and storage tank.
- After positioning the tank, plan the routing for the pipes from the solar collector to the storage tank. Use a routing that is as direct and short as possible to minimize heat loss during water transfer. Using insulated pipes also helps maintain the temperature of the heated water.
- Installing the temperature and pressure relief valve in the storage tank ensures safety by releasing excess pressure.
- Connect the solar collector outlet to the storage tank inlet making sure the connections are tight and without leakage. Use appropriate flow control valves to regulate water circulation depending on your system type (gravity-flow or pumped).
- Add insulation to the connecting pipes to safeguard against heat loss during water transfer thus maintaining water temperature.
- Before sealing the connections, test the system to ensure smooth water flow while checking for any leaks or issues.
Installation of Heat Exchanger and Controller
The heat exchanger system plays an important role here since it allows for the heat transfer to the water storage tank from solar collector. Alternately, the controller helps regulate the system’s operation such as monitoring the temperature in the collector and storage tank.
When installing the heat exchanger and controller, consider the following procedure:
- Choose a suitable heat exchanger based on your system design and materials. You have the option of using plate heat exchangers, coiled copper pipes, or double-walled shell and tube heat exchangers.
- Install the heat exchanger in the water storage tank by immersing in the water. This allows, for circulation of water all around the heat exchanger surface facilitating efficient heat transfer.
- Connect one end of the heat exchanger to the solar collector outlet using appropriate plumbing components to make a secure connection. Insulate the heat exchanger and the connecting pipes to minimize heat loss during water transfer.
- Select a controller that suits your system’s needs with features not limited to temperature sensors, thermostats, and pumps. A controller helps manage the flow of heat transfer fluid between the solar collector and storage tank.
- Mount the controller in a convenient and accessible location near the water storage tank protected from water and the elements.
- Follow the provided wiring instructions from the manufacturer ensuring the connections are secure and well-insulated.
- Configure the controller’s settings based on your needs and the desired water temperature setting up thresholds for automatic operation where possible.
- Test the entire system to ensure proper functioning of the heat exchanger, controller, and plumbing connections. In verifying the operation, monitor the temperature and water flow. Seal and secure all the plumbing and electrical connections upon successful testing.
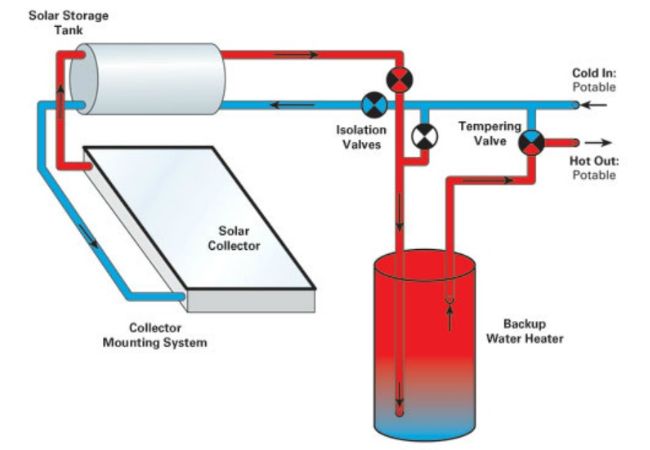
Connecting to the Existing Water Heater
Connecting a solar water heater to an existing water heater is an integration measure that improves performance efficiency. Many times, the solar water heater supplements the existing water heater by first preheating the water.
Here’s how you can connect the solar water heater to the existing water heater:
- Before commencing any plumbing work, turn off the power to the existing water heater and shut off the water supply. Assess the type (electric or gas) and capacity of your existing water heater.
- Identify the cold water inlet and hot water outlet connections on the existing water heater. Determine a path for the plumbing connections from the solar collector into the cold water inlet of the existing water heater.
- When using a closed-loop system or facing incompatibility between the working fluid and water, you may need a heat exchanger. Install the necessary plumbing components to connect the solar water heater to the existing water heater.
- Insulate the pipes that carry the solar-heated water to minimize heat loss during transfer before carryout out a test run.
- Secure all connections using appropriate sealants or fittings and turn on the water supply and power to the existing water heater.
Plumbing Works
Proper plumbing ensures the flow of water between the solar collector, storage tank, and existing water heating system (if applicable) is efficient. A guide to the plumbing works involved in a DIY solar water heater installation takes the following form:
- Plan the layout of the plumbing system, considering the position of the solar collector, storage tank, and existing water heater. Determine the best path for water flow to minimize heat loss and ensure efficient water circulation.
- Connect the solar collector outlet to the inlet of the storage tank or that of an existing water heating system. Utilize appropriate pipes and fittings, using flow control valves for regulating water circulation depending on your system type (gravity-flow or pumped).
- Installing a temperature and pressure relief valve in the tank ensures safety by releasing excess pressure owing to increasing temperatures or pressure.
- Add insulation to all the pipes carrying heated water after making the connection to minimize heat loss during water transfer. Test the entire plumbing system by running water, monitoring the flow between the collector, tank, and existing water heater.
Testing the System
Filling and testing the system ensures it is properly set up and functioning efficiently before rolling out. The testing process entails the following:
- Before filling the system, undertake an intricate check ensuring all system components are properly installed and secured.
- Close the flow control valves in the plumbing during the filling process to prevent water from flowing. Open any air vents or bleed valves to allow escape of trapped air as water fills the system.
- Fill the solar water heater system with water starting with the storage tank. Allow water to flow through the plumbing and the solar collector as trapped air escapes through the open vents.
- While the system is filled with water carefully inspect all plumbing connections and components for any signs of leakage. Address any leaks immediately by applying appropriate sealants or tightening connections.
- Monitor the air vents and bleed valves ensuring all air is purged from the system. You observe a continuous flow of water without air bubbles from the vents when this happens.
- When using a pumped circulation, turn on the circulation pump. Otherwise water flows via natural convection once the valves are opened.
- Allow the solar water heater system to operate for a few hours with adequate sunlight. Monitor the water temperature in the storage tank to ensure it rises as the sun heats the collector.
- Where you have a controller, verify its functionality in regulating the system’s operation as desired. Make changes to the system or controller settings to desired levels based off your observations during the testing to optimize performance.
Conclusion
Making and installing a solar water heater can be a complex task especially when inexperienced with plumbing and heating systems. When undertaking a DIY project for your solar water heater it’s best to consult a professional for system success and safety.
More Resources:
Solar Water Heater Plans – Source: Liter of Light
Solar Water Heating System – Source: Water Heater Hub
DIY Pool Water Heater – Source: Swim University
How to Do-it-yourself Solar Water Heater – Source: Handy Man
Pingback: cialis generic timeline
Pingback: where to buy generic cialis?
Pingback: generic cialis online canada
Pingback: tesco pharmacy viagra prices
Pingback: valium in india pharmacy
Pingback: cialis paypal canada
Pingback: viagra price in us
Pingback: buying viagra
Pingback: how long does cialis last 20 mg
Pingback: tadalafil mylan
Pingback: viagra in hong kong pharmacy
Pingback: sildenafil canadian online pharmacy
Pingback: viagra 100mg cost in usa
Pingback: female viagra in india price
Pingback: sildenafil tablets 150mg
Pingback: where to buy generic viagra online safely
Pingback: buy generic viagra online free shipping
Pingback: cialis no prerscription
Pingback: cialis tadalafil patent
Pingback: cialis manufacturer
Pingback: buy cialis information
Pingback: flagyl zwanger
Pingback: side effects of sulfamethoxazole
Pingback: gabapentin milligrams
Pingback: valacyclovir chinese
Pingback: tamoxifen rugpijn
Pingback: how to wean off lyrica 50 mg
Pingback: metformin cukorbetegség
Pingback: lisinopril zinc
Pingback: bendroflumethiazide furosemide
Pingback: can i take xanax with rybelsus
Pingback: rybelsus 14 mg price
Pingback: can i take farxiga and rybelsus together
Pingback: how much is fluoxetine without insurance
Pingback: cymbalta and muscle spasms
Pingback: metronidazole mycoplasma
Pingback: does zoloft work
Pingback: escitalopram kroger rx
Pingback: can cephalexin cause headaches
Pingback: can you take keflex if you have a penicillin allergy
Pingback: online viagra in us
Pingback: what is lexapro used for
Pingback: gabakim gabapentin
Pingback: duloxetine liver side effects
Pingback: antibiotics ciprofloxacin
Pingback: cephalexin for kidney infection
Pingback: bactrim pediatric dosing chart
Pingback: bactrim classification
Pingback: amoxicillin with potassium
Pingback: diclofenac sodium 75mg reviews
Pingback: ddavp availability
Pingback: flomax prostate infection
Pingback: flexeril and hydrocodone
Pingback: diltiazem toxicity
Pingback: citalopram cost
Pingback: augmentin liquid
Pingback: what is the usual dosage for effexor
Pingback: ezetimibe atherosclerosis
Pingback: cozaar generic
Pingback: contrave constipation
Pingback: depakote and alcohol
Pingback: allopurinol 100mg tablets
Pingback: aspirin vs advil
Pingback: aripiprazole lauroxil vs abilify maintena
Pingback: how does amitriptyline work for nerve pain
Pingback: bupropion seizure
Pingback: amoxicillin vs augmentin
Pingback: another name for celexa
Pingback: celebrex over the counter
Pingback: buspar reviews for anxiety
Pingback: is baclofen a muscle relaxer
Pingback: semaglutide 0.25 0.5mg/dose pen device
Pingback: remeron maoi
Pingback: acarbose insert
Pingback: repaglinide category
Pingback: actos iniciales
Pingback: can you buy protonix over the counter
Pingback: robaxin for withdrawal
Pingback: abilify vs latuda
Pingback: synthroid rage
Pingback: ivermectin 3mg dose
Pingback: generic spironolactone
Pingback: voltaren gel dosage card
Pingback: venlafaxine er 150 mg
Pingback: what is tizanidine 4 milligram tablets
Pingback: tamsulosin samenerguss blase
Pingback: sitagliptin saxagliptin linagliptin and alogliptin
Pingback: tadalafil without a doctor prescription
Pingback: sildenafil 20 mg tablet
Pingback: cialis levitra viagra
Pingback: cialis online pills
Pingback: sildenafil dosage by weight
Pingback: offshore pharmacy no prescription
Pingback: lexapro discount pharmacy
Pingback: how to order levitra online
Pingback: ivermectin lice oral
Pingback: vardenafil 20mg tab
Pingback: viagra soft cheap
Pingback: what question should the nurse ask when assessing for therapeutic effects of vardenafil?
Pingback: stromectol drug
Pingback: ivermectin medicine
Pingback: ivermectin 1 cream generic
Pingback: reddit tadalafil
Pingback: tadalafil brand name
Pingback: ivermectin 6mg
Pingback: generic viagra buy online india
Pingback: buy stromectol uk
Pingback: gabapentin 100mg para que sirve
Pingback: does doxycycline treat gonorrhea
Pingback: ampicillin sodium and sulbactam sodium injection
Pingback: augmentin 875 dosage
Pingback: metformin online
Pingback: side effects from prednisone
Pingback: is provigil an mao inhibitor
Pingback: price of amoxil
Pingback: pregabalin medication
Pingback: can keflex cause diarrhea
Pingback: valacyclovir uses
Pingback: lisinopril generic name
Pingback: cephalexin and birth control
Pingback: trazodone dosage by weight
Pingback: ciprofloxacin 500 tablet
Pingback: how long does tamoxifen stay in the body after stopping
Pingback: mexican pharmacy rohypnol
Pingback: levitra online store
Pingback: buy levitra fast
Pingback: tadalafil cialis
Pingback: zovirax cream online pharmacy
Pingback: levitra medication
Pingback: sildenafil for premature ejaculation
Pingback: mexican pharmacy concerta
Pingback: sildenafil reddit
Pingback: vardenafil natural
Pingback: benefits of cialis
Pingback: sildenafil 150 mg
Pingback: rx pharmacy richland wa
Pingback: viagra cost pharmacy
Pingback: discount tadalafil
Pingback: united pharmacy finpecia
Pingback: vardenafil daily use
Pingback: online pharmacy valium india
Pingback: what is tadalafil used for
Pingback: tadalafil controlled substance
Pingback: klonopin online pharmacy reviews
Pingback: lortab 10 pharmacy price
Pingback: sildenafil vs tadalafil side effects
Pingback: adipex pharmacy coupon
Pingback: sildenafil or tadalafil which is better
Pingback: tegretol dosage for bipolar
Pingback: epilepsy medicine carbamazepine
Pingback: neurontin off label uses
Pingback: does celebrex help with back pain
Pingback: sulfasalazine and sulfa allergy
Pingback: gabapentin priapism
Pingback: celecoxib black box
Pingback: effects of etodolac
Pingback: 800 mg ibuprofen 14 year old
Pingback: motrin 800 and acetaminophen
Pingback: mestinon composizione
Pingback: amitriptyline and alcohol
Pingback: mebeverine and painkillers
Pingback: ph solubility of indomethacin